安卓 kotlin Jetpack Compose 定西 2024-12-20 2024-12-29 Compose API 设计原则 视图树一旦生成便不可随意改变,视图的刷新依靠Composable函数的反复执行来实现
composable函数只能在composeable函数中调用
在Compose的世界中,一切组件都是函数,由于没有类的概念,因此不会有任何继承的层次结构,所有组件都是顶层函数
可以在DSL中直接调用
Composable作为函数相互没有继承关系 ,有利于促使开发者使用组合的视角去思考问题
基本概念啥的都有点不太一样,和之前学的
常用UI组件 Compose提供了Column,Row,Box三种布局组件,类似于传统视图中的LinearLayout(Vertical),LinearLayout(Horizontal),RelativeLayout
Modifier修饰符 Modifier允许我们同诺链式调用的写法来为组件应用一系列的样式设置,如边距,字体,位移等,在Compose中,每个基础的Composable组件都有一个modifier参数,通过传入自定义的Modifier来修改组件的样式
size
设置组件大小
1
2
3
4
5
6
7
8
9
10
11
12
13
14
Image( painterResource(id = R.drawable.shiguang2), contentDescription = null , modifier = Modifier .size(100. dp) .clip(CircleShape) ) Image( painterResource(id = R.drawable.shiguang2), contentDescription = null , modifier = Modifier .size(width = 200. dp, height = 500. dp) )
background
用来为修饰组件添加背景色,背景色支持设置color的纯色背景也可以使用brush设置渐变色背景,Brush是Compose提供的用来创建线性渐变色的工具
1
2
3
4
5
6
7
8
9
10
11
12
13
14
15
16
17
18
19
20
21
22
23
24
25
26
Row { Box( Modifier .size(50. dp) .background(color = Color.Red) ) { Text("纯色" , Modifier.align(Alignment.Center)) } Spacer(modifier = Modifier.width(16. dp)) Box( Modifier .size(50. dp) .background(brush = verticalGradientBrush) ) { Text("渐变色" , Modifier.align(Alignment.Center)) } } val verticalGradientBrush = Brush.verticalGradient( colors = listOf( Color.Red, Color.Yellow, Color.Green ) )
传统视图中的View的background属性可以用来设置图片格式的背景,但是这里是不支持的,Compose的background只能设置颜色背景
fillMaxSize
size可以控制组件的大小,而fillMaxSize可以让组件在高度或者宽度上填满父空间,此时可以用fillMaxSize
1
2
3
4
5
6
7
8
9
10
11
12
13
Row( Modifier.background(Color.Yellow).width(100. dp).height(200. dp) ) { Box( Modifier.fillMaxWidth().height(50. dp).background(Color.Blue) ) }
border&padding
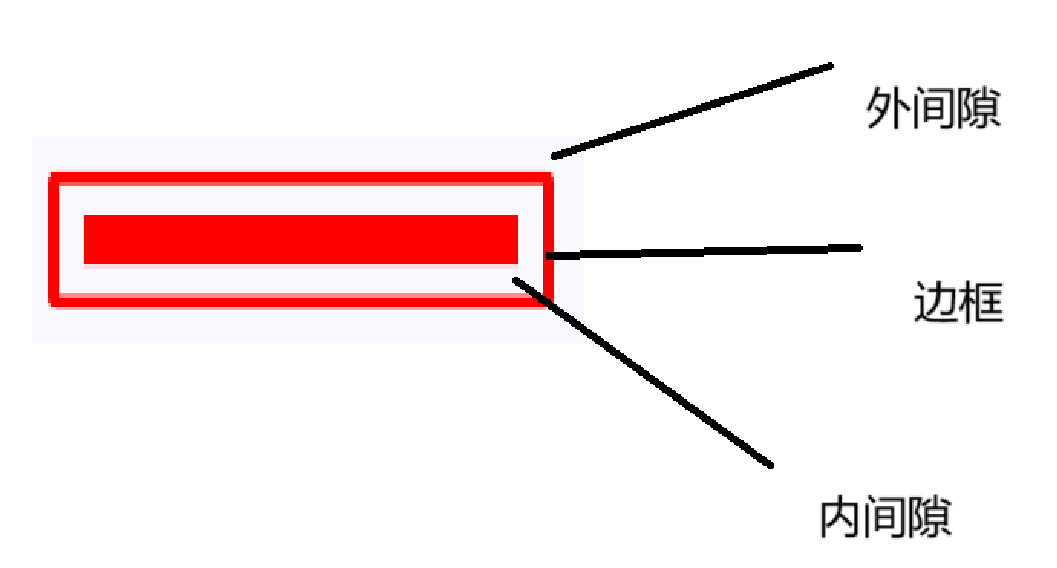
border用来为被修饰组件添加边框,边框可以指定颜色,粗细,以及通过Shape指定形状,比如圆角矩形等,padding用来为被修饰组件增加间隙,可以在border前后各插入一个padding,区分对外和对内的比间距
1
2
3
4
5
6
7
8
9
10
11
12
Box( modifier = Modifier .padding(8. dp) .border(2. dp, Color.Red, shape = RoundedCornerShape(2. dp)) .padding(8. dp) ){ Spacer( Modifier .size(width = 100. dp, height = 10. dp) .background(Color.Red) ) }
相对于传统布局有Margin和Padding之分,Compose中只有padding这一种修饰符,根据在调用链的位置不同发挥不同的作用,概念更加简洁
offset
offset修饰符用来移动被修饰组件的位置,我们在使用时只分别传入水平方向与垂直方向的偏移量
Modifier调用顺序会影响最终UI呈现的效果,这里应使用offset修饰符偏移,再使用background修饰符绘制背景色
1
2
3
4
5
6
7
8
9
10
11
12
Box( Modifier .size(100. dp) .offset { IntOffset( 200. dp.roundToPx(), 150. dp.roundToPx() ) } .background(Color.Red) )
作用域限定Modifier修饰符 某些Modifier修饰符只能在特定作用域中使用,有利于类型安全地调用它们,所谓作用域,在Kotlin中就是一个带有Receiver的代码,例如Box组件参数中的conent就是一个Receiver类型为BoxScope的代码块,因此其子组件都处于BoxScope作用域中
matchParentSize
matchParentSize是只能在BoxScope中使用的作用域限定修饰符,当使用matchParentSize设置尺寸时,可以保证当前组件的尺寸与父组件相同,而父组件默认的是wrapContent,这个相当于根据内层组件的大小来确定自己的大小
但是如果使用fillMaxSize来取代matchParentSize,那么该组件的尺寸会被设置为父组件所允许的最大尺寸,这样会导致背景铺满整个屏幕
weight
在RowScope与ColumnScope中可以使用专属的weight修饰符来设置尺寸,与size修饰符不同的是,weight修饰符允许组件通过百分比设置尺寸,也就是允许组件可以自适应适配各种屏幕尺寸的移动终端设备
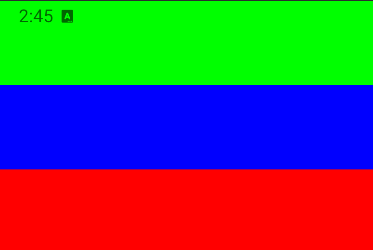
案例:希望让白色方块、蓝色方块和红色方块共享一整块Column空间,其中每种颜色方块高度各占比1/3,使用weight修饰符可以很容易地实现
1
2
3
4
5
6
7
8
9
10
11
12
13
14
15
16
17
18
19
20
21
22
23
24
@Composable fun WeightModifierDemo () Column( Modifier .width(300. dp) .height(200. dp) ) { Box( Modifier .weight(1f ) .fillMaxWidth() .background(Color.Green)) Box( Modifier .weight(1f ) .fillMaxWidth() .background(Color.Blue)) Box( Modifier .weight(1f ) .fillMaxWidth() .background(Color.Red)) } }
Modifier实现原理 Modifier调用顺序会影响到最终UI的呈现效果,这是因为Modifier会由于调用顺序不同而产生不同的Modifier链,Compose会按照Modifier链来顺序完成页面测量布局与渲染
Modifier实际上是一个接口:
1 2 3 4 5 6 7 8 9 10 11 12 13 14 15 16 17 18 19 20 21 22 23 24 25 26 27 28 29 30 31 @Suppress("ModifierFactoryExtensionFunction" ) @Stable @JvmDefaultWithCompatibility interface Modifier { fun <R> foldIn (initial: R , operation: (R , Element ) -> R ) fun <R> foldOut (initial: R , operation: (Element , R ) -> R ) fun any (predicate: (Element ) -> Boolean ) Boolean }
嗯,这一段,等会用了再看吧,先会用,再理解概念
常用的基础组件
Text文本
源码
1
2
3
4
5
6
7
8
9
10
11
12
13
14
15
16
17
18
19
20
@Composable fun Text ( text: String , modifier: Modifier = Modifier, color: Color = Color.Unspecified, fontSize: TextUnit = TextUnit.Unspecified, fontStyle: FontStyle ? = null , fontWeight: FontWeight ? = null , fontFamily: FontFamily ? = null , letterSpacing: TextUnit = TextUnit.Unspecified, textDecoration: TextDecoration ? = null , textAlign: TextAlign ? = null , lineHeight: TextUnit = TextUnit.Unspecified, overflow: TextOverflow = TextOverflow.Clip, softWrap: Boolean = true , maxLines: Int = Int .MAX_VALUE, minLines: Int = 1 , onTextLayout: ((TextLayoutResult ) -> Unit )? = null , style: TextStyle = LocalTextStyle.current )
最佳实践:Text组件的参数会按照其使用频度排序,并尽量添加默认实现,便于在单元测试或者预览中使用,我们自定义的Composable组件也应该遵循这样的参数设计原则
1
2
3
4
5
6
7
8
9
10
11
12
13
14
15
16
17
18
19
20
21
22
23
24
25
26
27
28
29
30
31
32
33
34
35
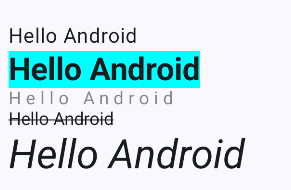
@Composable fun TextDemo () Column { Spacer(Modifier.size(100. dp)) Text( text = "Hello Android" ) Text( text = "Hello Android" , style = TextStyle( fontSize = 25. sp, fontWeight = FontWeight.Bold, background = Color.Cyan, lineHeight = 35. sp ) ) Text( text = "Hello Android" , style = TextStyle( color = Color.Gray, letterSpacing = 4. sp ) ) Text( text = "Hello Android" , style = TextStyle( textDecoration = TextDecoration.LineThrough ) ) Text( text = "Hello Android" , style = MaterialTheme.typography.headlineLarge.copy(fontStyle = FontStyle.Italic) ) } }
style中的部分参数也可以直接在Text中直接设置,例如字体大小,粗细,且Text参数会覆盖掉style中的样式
AnnotatedString多样式文字
在一段文字中对局部内容应用特别格式一示突出
AnnotatedString
SpanStyle:用于描述在文本中子串的文字样式
ParagraphStyle:用于描述文本中子串额段落格式
Range:确定子串的范围
1
2
3
4
5
6
7
8
9
10
11
12
13
14
15
16
17
18
19
20
21
22
23
24
25
26
27
28
29
30
31
32
Text( text = buildAnnotatedString { withStyle(style = SpanStyle(fontSize = 24. sp)) { append("你现在学习的章节是" ) } withStyle( style = SpanStyle( fontWeight = FontWeight.W900, fontSize = 24. sp ) ) { append("Text" ) } append("\n" ) withStyle(style = ParagraphStyle(lineHeight = 25. sp)) { append("在刚刚讲的内容中,我们学会了如何应用文字样式,以及如何限制文本的行数和处理溢出的视觉效果" ) append("\n" ) append("现在,我们正在学习" ) withStyle( style = SpanStyle( fontWeight = FontWeight.W900, textDecoration = TextDecoration.Underline, color = Color(0xFF59AB69 ) ) ) { append("AnnotatedString" ) } } } )
SpanStyle继承了TextStyle中关于文字样式相关的字段,而ParagraphStyle继承了TextStyle中控制段落的样式,例如textAligh,lineHeight等,某种意义上二者拆分了TextStyle,可以对子串分别进行文字以及段落样式设置
Compose提供了一种可以点击的文本组件ClickedText,可以响应我们对文字的点击,并返回点击位置
Text自身默认是不能被长按选择的,否则在Button中使用,又会出现”可粘贴的Button”的例子
Compose提供了专门的SelectionContainer组件,对包裹的Text进行选中
1 2 3 4 SelectionContainer { Text("这是可复制的文字" ) }
TextField输入框
最常用的文本输入框,具有两种风格,一种是默认,也就是filled,另一种是OutlinedTextField
使用var text by remember { mutableStateOf("") }报错时,可能是没有导入下面两个依赖
1
2
import androidx.compose.runtime.getValue import androidx.compose.runtime.setValue
1
2
3
4
5
6
7
8
9
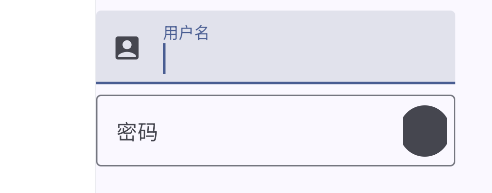
@Composable fun TextFiledDemo () var text by remember { mutableStateOf("" ) } TextField(value = text, onValueChange = { text = it }, label = { Text("用户名" ) }) }
就是这个样子的:
为输入框添加修饰
1
2
3
4
5
6
7
8
9
10
11
12
13
14
15
16
17
18
19
20
21
22
23
24
25
26
27
28
29
30
31
32
33
34
35
36
37
38
39
40
41
42
@Composable fun TextFiledSample () var username by remember { mutableStateOf("" ) } var password by remember { mutableStateOf("" ) } Column { TextField( value = username, onValueChange = { username = it }, label = { Text("用户名" ) }, leadingIcon = { Icon( imageVector = Icons.Filled.AccountBox, contentDescription = stringResource(R.string.description) ) }, maxLines = 1 ) OutlinedTextField( value = password, onValueChange = { password = it }, label = { Text("密码" ) }, trailingIcon = { IconButton(onClick = {}) { Icon( painter = painterResource(id = R.drawable.shiguang2), contentDescription = stringResource(R.string.description) ) } }, maxLines = 1 ) } }
两种风格的输入框,都自带动效
需要注意的是,TextField和OutlinedTextField都是遵循Material Desingn准则的,所以无法直接修改输入框的高度,如果尝试修改高度,会看到输入区域被截断
这时就可以使用更基础的BasicTextField,这种输入框有更多的可自定义的参数
B站风格搜索框
1 2 3 4 5 6 7 8 9 10 11 12 13 14 15 16 17 18 19 20 21 22 23 24 25 26 27 28 29 30 31 32 33 34 35 36 37 38 39 40 41 42 43 44 45 46 47 48 49 50 51 52 53 54 55 56 57 58 59 60 61 62 63 64 65 66 @Composable fun SearchBar () var text by remember { mutableStateOf("" ) } Box( Modifier .fillMaxSize() .background(Color(0xFFD3D3D3 )), contentAlignment = Alignment.Center ) { BasicTextField( value = text, maxLines = 1 , onValueChange = { text = it }, decorationBox = { innerTextField -> Row( verticalAlignment = Alignment.CenterVertically, modifier = Modifier.padding(vertical = 2. dp, horizontal = 8. dp) ) { Icon( imageVector = Icons.Filled.Search, contentDescription = stringResource(R.string.description) ) Box( modifier = Modifier .padding(horizontal = 10. dp) .weight(1f ), contentAlignment = Alignment.CenterStart, ) { if (text.isEmpty()) { Text( text = "输入点东西看看吧~" , style = TextStyle( color = Color(0 , 0 , 0 , 128 ) ) ) } innerTextField() } if (text.isNotEmpty()) { IconButton( onClick = { text = "" }, modifier = Modifier.size(16. dp) ) { Icon( imageVector = Icons.Filled.Close, contentDescription = stringResource(R.string.description) ) } } } }, modifier = Modifier .padding(horizontal = 10. dp) .background(Color.White, CircleShape) .height(30. dp) .fillMaxWidth() ) } }
说实话,并没有感觉这玩意比前端好写,甚至感觉这写起来比前端麻烦多了,而且结构不清晰
图片组件
Icon图标
Icon组件用于显示一系列小图标,Icon组件支持三种不同类型的图片设置
Icon可以传入Resource中的资源
imageVector
imageBitmap
vectorResource
imageResource
painterResource
可以直接使用Material包中的图标
1
2
3
4
5
6
7
8
@Composable fun IconSample () Icon( imageVector = Icons.Filled.Favorite, contentDescription = null , tint = Color.Red ) }
Icon组件还可以加载网络上下载的图标库,google图标库
Image图片
image组件中有一个contentScale参数用来指定图片在Image组件中的伸缩样式
1
2
3
4
5
6
7
8
9
10
11
12
@Composable fun ImageSample () Image( painterResource(id = R.drawable.shiguang2), contentDescription = null , modifier = Modifier.size(width = 100. dp, height = 200. dp), contentScale = ContentScale.FillBounds ) }
colorFilter参数用于设置一个ColorFilter,它可以通过对绘制的图片的每个像素的颜色进行修改,实现不同的图片效果
tint
colorMatrix
lighting 灯光效果
1
2
3
4
5
6
7
8
9
10
11
12
13
14
15
16
17
18
19
20
21
22
var colorMatrix = ColorMatrix().apply { setToSaturation(0f ) } @Composable fun ImageSample () Image( painterResource(id = R.drawable.shiguang2), contentDescription = null , modifier = Modifier.size(width = 100. dp, height = 200. dp), contentScale = ContentScale.Crop, colorFilter = ColorFilter.lighting( multiply = Color.Red, add = Color.Blue ) ) }
按钮组件
3.1 Button按钮是最常用的组件之一,这里的Button默认没有任何UI,仅仅是一个相应onClick的容器,它的UI需要在content中通过其他组件来实现
创建一个显示文件的Button
1
2
3
4
5
6
7
8
9
10
@Composable fun ButtonSampe () Button( onClick = { println("哈哈" ) } ) { Text("确认" ) } }
content提供了RowScope的作用域,所以当我们想在文字前面水平摆放一个Icon时,只需要在content中顺序书写即可
1
2
3
4
5
6
7
8
9
10
11
12
13
14
15
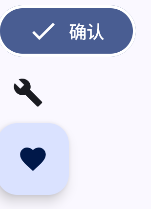
@Composable fun ButtonSampe () Button( onClick = { println("哈哈" ) } ) { Icon( imageVector = Icons.Filled.Check, contentDescription = null ) Spacer(Modifier.size(ButtonDefaults.IconSpacing)) Text("确认" ) } }
有一个重要的参数interactionSource,可以监听组件状态的事件源
1
2
3
4
5
6
7
8
9
10
11
12
13
14
15
16
17
18
19
20
21
22
23
24
25
@Composable fun ButtonSampe () var interactionSource = remember { MutableInteractionSource() } var pressState = interactionSource.collectIsPressedAsState() val borderColor = if (pressState.value) Color.Green else Color.White Button( onClick = { println("哈哈" ) }, border = BorderStroke(2. dp, color = borderColor), interactionSource = interactionSource ) { Icon( imageVector = Icons.Filled.Check, contentDescription = null ) Spacer(Modifier.size(ButtonDefaults.IconSpacing)) Text("确认" ) } }
当按下按钮时,会改变边框颜色
Button并非唯一可点击组件,理论上任何Composable组件都可以通过Modifier.clickable修饰符化身可点击组件
3.2 IconButton图标按钮
IconButton是Button组件的简单封装(一个可点击的图标),一般用于应用栏中的导航
1
2
3
4
5
6
7
8
9
10
11
12
13
@Composable fun IconButtonSample () IconButton( onClick = { println("嘿嘿" ) } ) { Icon( Icons.Filled.Build, contentDescription = null ) } }
3.3 FloatingActionButton悬浮按钮
FloatingActionButton(FAB)一般代表当前页面的主要行为
1
2
3
4
5
6
7
8
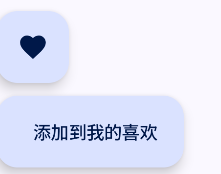
@Composable fun FAB () FloatingActionButton( onClick = {} ) { Icon(Icons.Filled.Favorite, contentDescription = null ) } }
除了普通的FAB外,还有带有文字拓展的FAB,即
1
2
3
4
5
6
7
8
@Composable fun FAB2 () ExtendedFloatingActionButton( icon = { Icons.Filled.Favorite }, text = { Text("添加到我的喜欢" ) }, onClick = {} ) }
选择器
4.1 Checkbox复选框
1
2
3
4
5
6
7
8
9
10
11
@Composable fun CheckboxSample () val checkState = remember { mutableStateOf(true ) } Checkbox( checked = checkState.value, onCheckedChange = { checkState.value = it }, colors = CheckboxDefaults.colors( checkedColor = Color(0xFF0079D3 ) ) ) }
4.2 TriStateCheckbox 三态选择框
很多时候,我们的复选框会有很多个,并且希望能够统一选择或者取消,这个时候就可以用到 TriStateCheckbox
1
2
3
4
5
6
7
8
9
10
11
12
13
14
15
16
17
18
19
20
21
22
23
24
25
26
27
28
29
30
31
32
33
34
35
@Composable fun TriStateCheckboxSample () val (state, onStateChange) = remember { mutableStateOf(true ) } val (state2, onStateChange2) = remember { mutableStateOf(true ) } val parentState = remember(state, state2) { if (state && state2) ToggleableState.On else if (!state && !state2) ToggleableState.Off else ToggleableState.Indeterminate } val onParentClick = { val s = parentState != ToggleableState.On onStateChange(s) onStateChange2(s) } TriStateCheckbox( state = parentState, onClick = onParentClick, colors = CheckboxDefaults.colors( checkedColor = MaterialTheme.colorScheme.primary ) ) Column(Modifier.padding(10. dp, 0. dp, 0. dp)) { Checkbox(state, onStateChange) Checkbox(state2, onStateChange2) } }
Switch单选开关
1
2
3
4
5
6
7
8
9
10
@Composable fun SwitchSample () val checkState = remember { mutableStateOf(true ) } Switch( checked = checkState.value, onCheckedChange = { checkState.value = it } ) }
Slider滑杆组件
Slider类似于传统视图的Seekbar,可以来做音量,亮度之类的数值调整或者进度条
1
2
3
4
5
6
7
8
9
10
11
12
@Composable fun SliderSample () var sliderPosition by remember { mutableStateOf(0f ) } Column(Modifier.padding(20. dp)) { Text(text = "%.1f" .format(sliderPosition * 100 ) + "%" ) Slider(value = sliderPosition, onValueChange = { sliderPosition = it }) } }
对话框
这个就挺像前端的对话框了
1
2
3
4
5
6
7
8
9
10
11
12
13
14
15
16
17
18
19
20
21
22
23
24
25
26
27
28
29
30
31
32
@Composable fun DialogSample () val openDialog = remember { mutableStateOf(true ) } val dialogWidth = 200. dp val dialogHeight = 50. dp Button(onClick = { openDialog.value = true }) { Text("弹出对话框" ) } if (openDialog.value) { Dialog(onDismissRequest = { openDialog.value = false }) { Row( Modifier .size(dialogWidth, dialogHeight) .background(Color.White) ) { Button( onClick = { openDialog.value = false } ) { Text("取消" ) } } } } }
在Dialog组件显示过程中,当我们点击对话框以外的区域时,onDismissRequest会出发执行,修改openDialo状态为false,触发DialogSample重组
5.1 AlertDialog警告对话框
1
2
3
4
5
6
7
8
9
10
11
12
13
14
15
16
17
18
19
20
21
22
23
24
25
26
27
28
29
30
31
32
33
34
35
36
37
38
39
40
@Composable fun AlertDialogSample () val openDialog = remember { mutableStateOf(false ) } Button(onClick = { openDialog.value = true }) { Text("获取位置服务" ) } if (openDialog.value) { AlertDialog( onDismissRequest = { openDialog.value = false }, title = { Text("开启未知服务" ) }, text = { Text("这将意味着:xxxxx" ) }, confirmButton = { TextButton(onClick = { openDialog.value = false }) { Text("同意" ) } }, dismissButton = { TextButton(onClick = { openDialog.value = false }) { Text("取消" ) } } ) } }
5.2 进度条
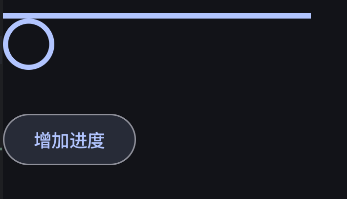
Compose提供了两种进度条,分别是圆形和直线的进度条,但是书上的写法好像已经过时了,而且写上都不动,加上一个大括号就是新的写法了
1
2
3
4
5
6
7
8
9
10
11
12
13
14
15
16
17
18
19
20
21
22
23
24
25
@Composable fun ProcessSample () var progress by remember { mutableStateOf(0.1f ) } val animatedProgress by animateFloatAsState( targetValue = progress, animationSpec = ProgressIndicatorDefaults.ProgressAnimationSpec ) Column { LinearProgressIndicator(progress = { animatedProgress }) LinearProgressIndicator() CircularProgressIndicator(progress = { animatedProgress }) CircularProgressIndicator() Spacer(Modifier.requiredHeight(30. dp)) OutlinedButton(onClick = { if (progress < 1f ) progress += 0.1f }) { Text("增加进度" ) } } }
没啥问题
常用的布局组件 线性布局
Column
1
2
3
4
5
6
7
@Composable inline fun Column ( modifier: Modifier = Modifier, verticalArrangement: Arrangement .Vertical = Arrangement.Top, horizontalAlignment: Alignment .Horizontal = Alignment.Start, content: @Composable ColumnScope .() -> Unit )
verticalArrangement和horizontalAlignment参数分别可以帮助我们安排子项的垂直/水平位置,在默认情况下,子项会以垂直方向上靠上,水平方向上靠左来布置
1
2
3
4
5
6
7
8
9
10
11
12
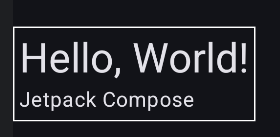
@Composable fun ColumnSample () Column( Modifier .border(1. dp, Color.White) .padding(5. dp)) { Text( text = "Hello, World!" , style = MaterialTheme.typography.headlineLarge ) Text("Jetpack Compose" ) } }
在不指定Column的高度和宽度时,Column会包裹里面的内容
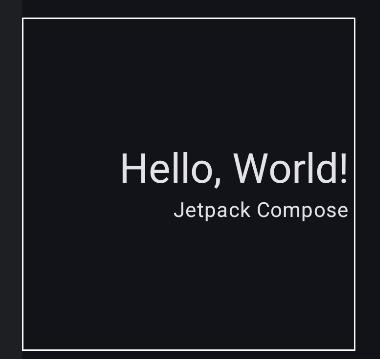
此时verticalArrangement和horizontalAlignment参数无法使用 ,只有指定了高度和宽度才能使用
1
2
3
4
5
6
7
8
9
10
11
12
13
14
15
16
17
18
@Composable fun ColumnSample () Column( Modifier .border(1. dp, Color.White) .padding(5. dp) .size(250. dp), verticalArrangement = Arrangement.Center, horizontalAlignment = Alignment.End ) { Text( text = "Hello, World!" , style = MaterialTheme.typography.headlineLarge ) Text("Jetpack Compose" ) } }
在设置了宽和高之后,也可以单独的欸子项设置对齐方式
1
2
3
4
5
6
7
8
9
10
11
12
13
14
15
16
17
@Composable fun ColumnSample () Column( Modifier .border(1. dp, Color.White) .padding(5. dp) .size(250. dp), verticalArrangement = Arrangement.Center, ) { Text( text = "Hello, World!" , style = MaterialTheme.typography.headlineLarge, modifier = Modifier.align(Alignment.End) ) Text("Jetpack Compose" ) } }
Modifier.align优先级高于horizontalAlignment
Row
Row组件能够将内部子项从左到右的方向水平排列
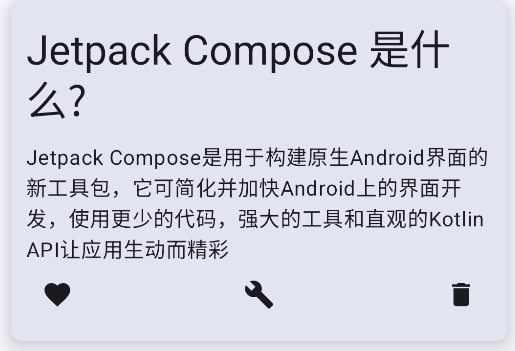
下面是一个文章卡片
1
2
3
4
5
6
7
8
9
10
11
12
13
14
15
16
17
18
19
20
21
22
23
24
25
26
27
28
29
30
31
32
33
34
35
36
37
38
39
40
41
42
43
@Composable fun Article () Surface( shape = RoundedCornerShape(8. dp), modifier = Modifier .padding(horizontal = 12. dp) .fillMaxWidth(), shadowElevation = 10. dp, tonalElevation = 10. dp ) { Column { Column(Modifier.padding(12. dp)) { Text( text = "Jetpack Compose 是什么?" , style = MaterialTheme.typography.headlineLarge ) Spacer(Modifier.padding(vertical = 5. dp)) Text( "Jetpack Compose是用于构建原生Android界面的新工具包,它可简化并加快Android上的界面开发," + "使用更少的代码,强大的工具和直观的Kotlin API让应用生动而精彩" ) Row( modifier = Modifier.fillMaxWidth(), horizontalArrangement = Arrangement.SpaceBetween ) { IconButton(onClick = {}) { Icon(Icons.Filled.Favorite, null ) } IconButton(onClick = {}) { Icon(Icons.Filled.Build, null ) } IconButton(onClick = {}) { Icon(Icons.Filled.Delete, null ) } } } } } }
Arrangement.SpaceBetween就和前端flex中一样,同样也有很多种属性
帧布局
Box
Box组件是一个能够将里面的子项一次按照顺序堆叠的布局组件,在使用上类似于FrameLayout
Surface
Surface从字面上来理解,是一个平面,在Material Design设计上同样如此,可以设置这个平面的边框,圆角,颜色等
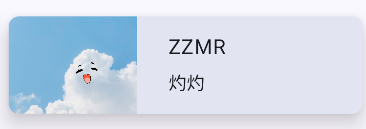
下面是一个卡片
1
2
3
4
5
6
7
8
9
10
11
12
13
14
15
16
17
18
19
20
21
22
23
24
25
26
27
28
29
30
31
32
33
34
35
@Composable fun SurfaceSample () Surface( shape = RoundedCornerShape(8. dp), shadowElevation = 10. dp, tonalElevation = 10. dp, modifier = Modifier .width(300. dp) .height(100. dp) .padding(12. dp) ) { Row( modifier = Modifier.clickable {} ) { Image( painter = painterResource(id = R.drawable.shiguang2), null , modifier = Modifier.size(100. dp), contentScale = ContentScale.Crop ) Spacer(Modifier.padding(horizontal = 12. dp)) Column( modifier = Modifier.fillMaxHeight(), verticalArrangement = Arrangement.Center ) { Text( text = "ZZMR" , style = MaterialTheme.typography.bodyLarge ) Spacer(Modifier.size(8. dp)) Text("灼灼" , style = MaterialTheme.typography.bodyMedium) } } } }
可以见得,Surface组件里面编写了主要的UI代码,而Surface本身负责整个组件的形状,阴影,背景等
ConstraintLayout约束布局 在使用之前,需要先加上依赖项
1 implementation libs.androidx.constraintlayout.compose.android
创建与绑定引用
在View系统中,我们在XML文件中可以为View组件设置资源ID,并将资源ID作为索引来申明组件应当摆放的位置,在Compose版本中的ConstrainLayout中,可以主动创建引用并绑定至某个具体组件上,从而实现资源ID相似的功能
在Compose中有两种创建引用的方始,createRef和createRefs
下面是使用约束布局实现的一个卡片
1
2
3
4
5
6
7
8
9
10
11
12
13
14
15
16
17
18
19
20
21
22
23
24
25
26
27
28
29
30
31
32
33
34
35
36
37
38
39
40
41
42
43
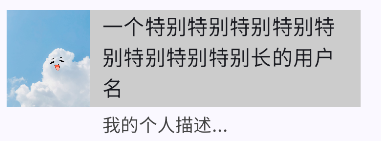
@Composable fun ConstraintLayoutSample () ConstraintLayout( modifier = Modifier .width(300. dp) .height(100. dp) .padding(12. dp) .background(Color.LightGray) ) { val (portraitImageRef, usernameTextRef, desTextRef) = remember { createRefs() } Image( painterResource(id = R.drawable.shiguang2), null , modifier = Modifier .fillMaxHeight() .constrainAs(portraitImageRef) { top.linkTo(parent.top) bottom.linkTo(parent.bottom) start.linkTo(parent.start) } ) Text( text = "Compose技术爱好者" , fontSize = 16. sp, maxLines = 1 , textAlign = TextAlign.Left, modifier = Modifier.constrainAs(usernameTextRef) { top.linkTo(portraitImageRef.top) start.linkTo(portraitImageRef.end, 10. dp) } ) Text( text = "我的个人描述..." , fontSize = 14. sp, color = Color.DarkGray, fontWeight = FontWeight.Light, modifier = Modifier.constrainAs(desTextRef) { top.linkTo(usernameTextRef.bottom, 5. dp) start.linkTo(portraitImageRef.end, 10. dp) } ) } }
当用户名过长时,可以通过设置end来指定组件最大所允许的宽度,并将width设置为preferred-WrapContent,这意味着当用户名较短时,实际宽度会随着长度进行自适应调整
1
2
3
4
5
6
7
8
9
10
11
12
Text( text = "一个特别特别特别特别特别特别特别特别长的用户名" , fontSize = 16. sp, textAlign = TextAlign.Left, modifier = Modifier.constrainAs(usernameTextRef) { top.linkTo(portraitImageRef.top) start.linkTo(portraitImageRef.end, 10. dp) end.linkTo(parent.end, 10. dp) width = Dimension.preferredWrapContent } )
好家伙,直接把下面的给挤出去了
Barrier分界线
举例:我们希望将连个输入框左对齐摆放,且距离文本组件中最长者仍保持10.dp的间隔,当用户名密码等发生变化时,输入框的位置能够自适应调整,在这个需求场景下,就需要使用到Barrier特性了,仅需要在两个文本结束处添加一条分界线即可
算了,这个Barrier导不进去
但是没怎么搞懂
1 val barrier = createEndBarrier(usernameTextRef1, passwordTextRef)
Guideline引导线
假设我们希望将用户头像摆放在距离屏幕顶部2:8的高度位置,头像以上部分为用户背景,头像以下的部分为用户信息
Chain链接约束
这三个特性,后面用到再看把
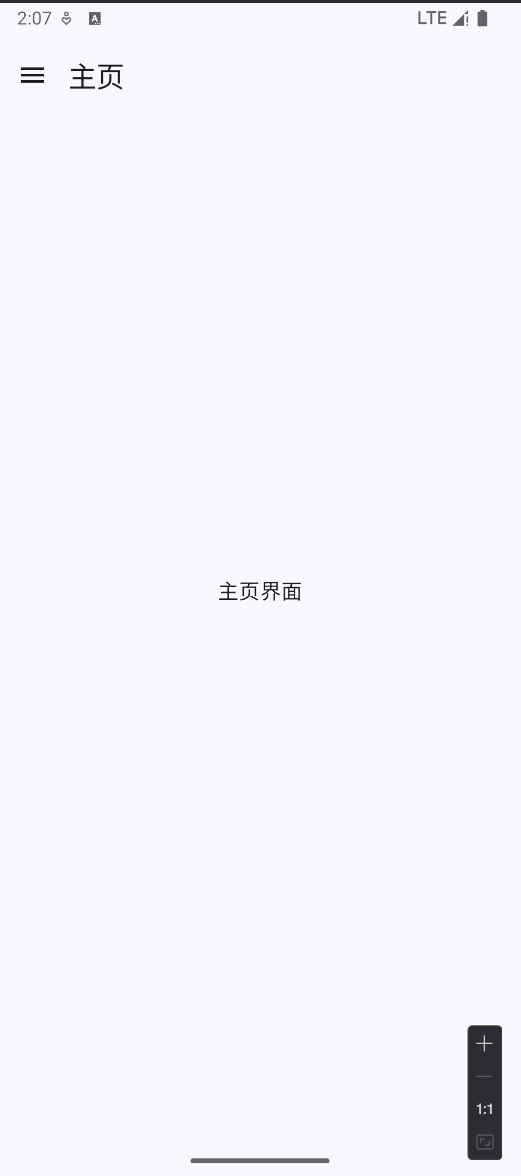
Scaffold脚手架 1 2 3 4 5 6 7 8 9 10 11 12 13 14 15 16 17 18 19 20 @OptIn(ExperimentalMaterial3Api::class) @Composable fun ScaffoldSample () Scaffold(topBar = { TopAppBar( title = { Text("主页" ) }, navigationIcon = { IconButton(onClick = {}) { Icon(Icons.Filled.Menu, null ) } } ) }) { Box(modifier = Modifier.fillMaxSize(), contentAlignment = Alignment.Center) { Text("主页界面" ) } } }
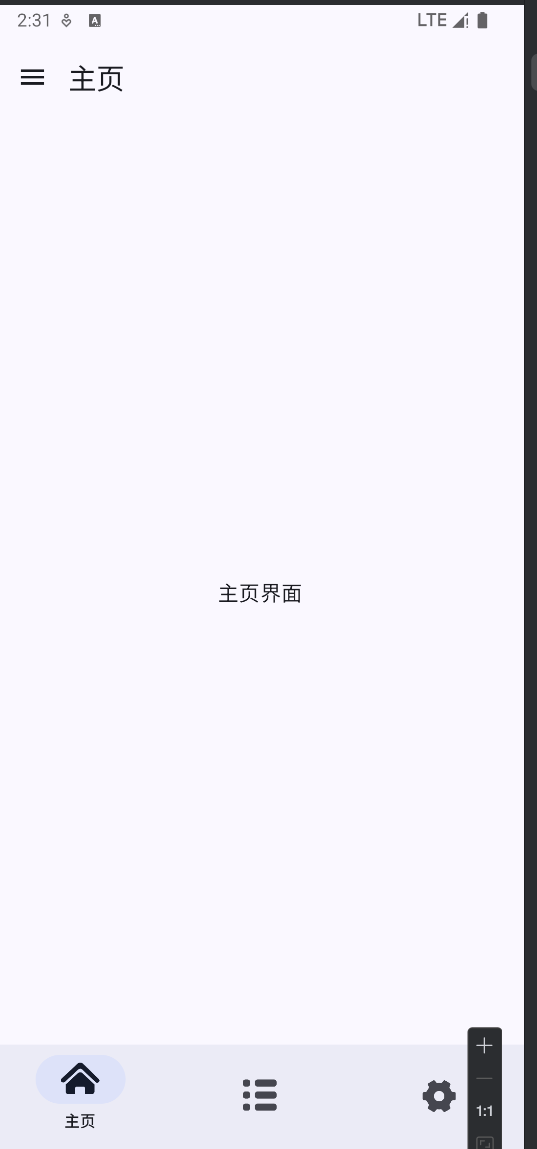
带底部导航的Scaffold
1 2 3 4 5 6 7 8 9 10 11 12 13 14 15 16 17 18 19 20 21 22 23 24 25 26 27 28 29 30 31 32 33 34 35 36 37 38 39 40 41 42 43 44 45 46 47 48 49 50 51 data class Item ( val name: String, val icon: Int ) @OptIn(ExperimentalMaterial3Api::class) @Composable fun Sample () var selectedItem by remember { mutableStateOf(0 ) } val items = listOf<Item>( Item("主页" , R.drawable.menu), Item("列表" , R.drawable.list), Item("设置" , R.drawable.settings), ) Scaffold( topBar = { TopAppBar(title = { Text("主页" ) }, navigationIcon = { IconButton(onClick = {}) { Icon(Icons.Filled.Menu, null ) } }) }, bottomBar = { NavigationBar() { items.forEachIndexed { index, item -> NavigationBarItem( selected = selectedItem == index, onClick = { selectedItem = index }, icon = { Icon( painterResource(item.icon), null , modifier = Modifier .size(30. dp) ) }, alwaysShowLabel = false , label = { Text(item.name) } ) } } } ) { Box(modifier = Modifier.fillMaxSize(), contentAlignment = Alignment.Center) { Text("主页界面" ) } } }
可惜的是侧边栏用不了不知道为啥
然后最后的懒加载列表啥的,后面用到再说吧
定制UI视图 2024年12月28日 22点39分
今天就洗洗睡吧
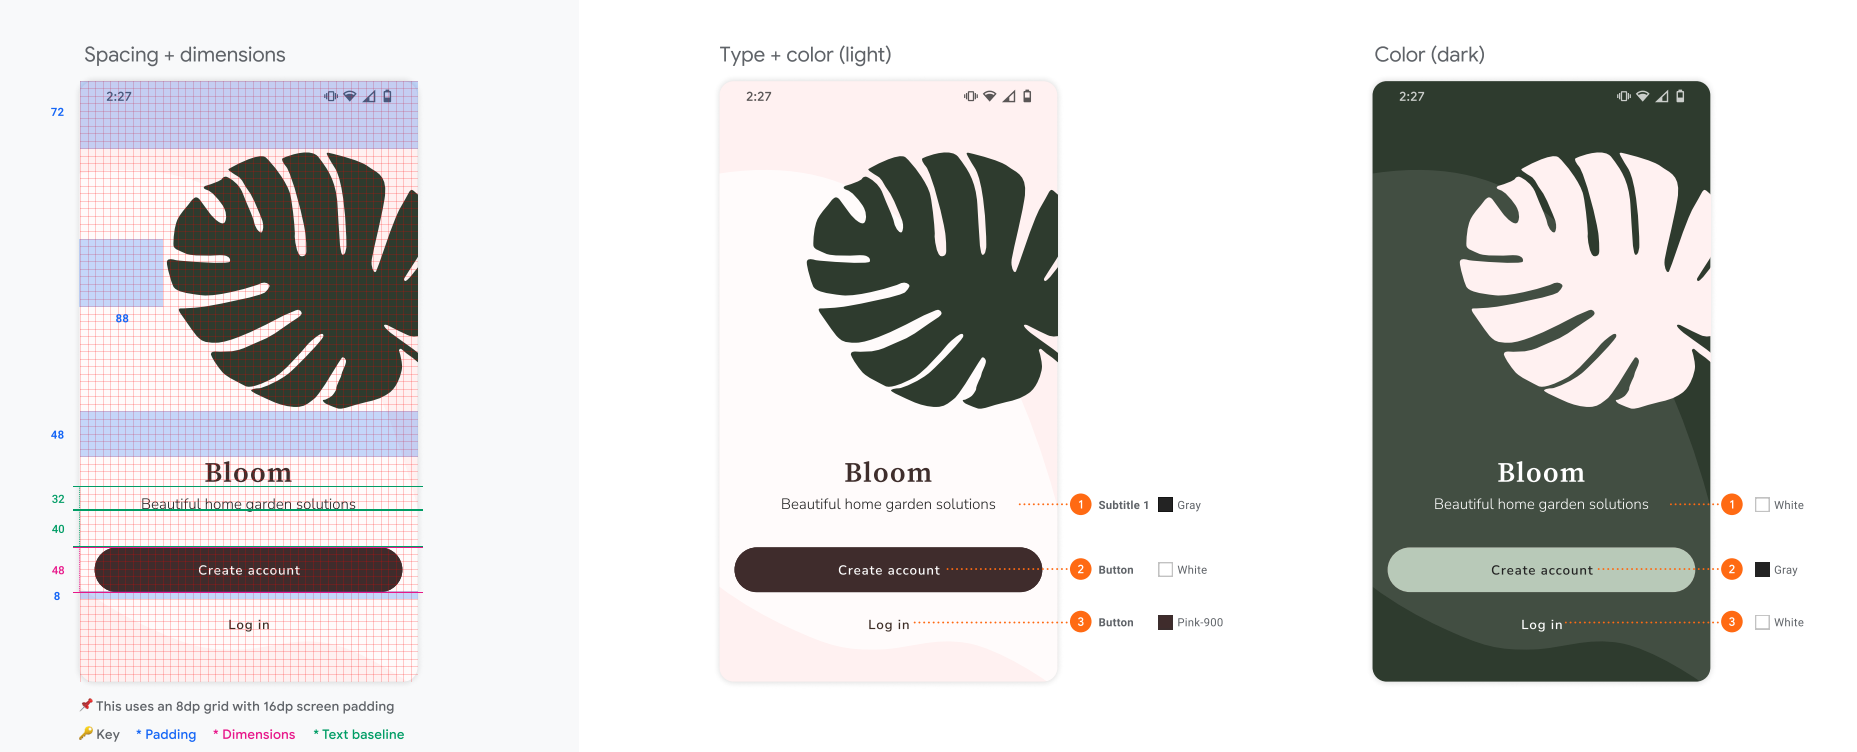
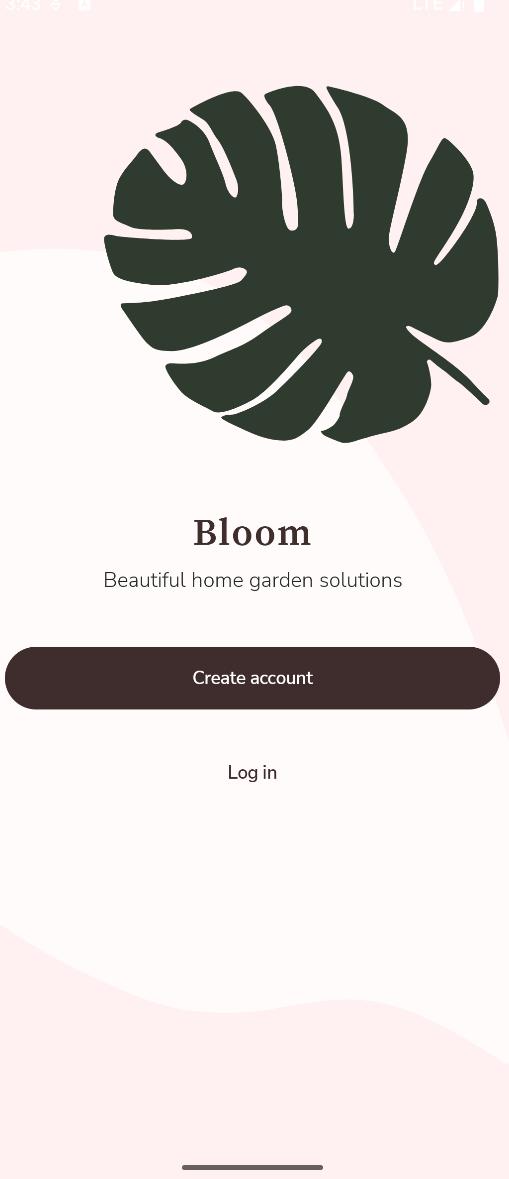
Bloom 欢迎页
可以看成,背景和内容两部分,此时可以使用Box组件
内容部分呢,又可以分成:
叶子图片
title
button
这时就可以使用Column组件,垂直摆放
title组件是一张Bloom字样的图片和一串文本的垂直排列,因此可以使用Column
登录页
分成
title
input
text
button
也是垂直Column即可
Home主页
同样是用Column分成几大块
ok,代码已经上传到仓库里了
主题 嗯,以后再说吧这个
状态管理与重组 